Decadent Chocolate Lava Cakes
Introduction to Decadent Chocolate Lava Cakes
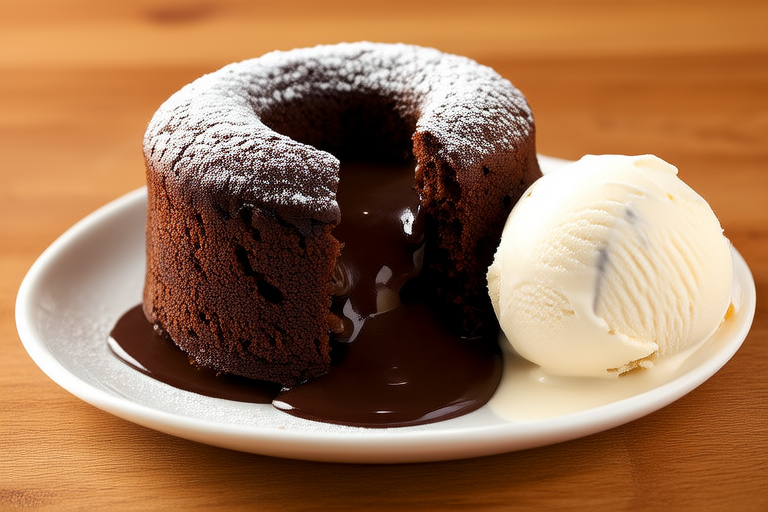
Welcome to my culinary blog, where we dive into the world of delectable desserts. Today, we’re going to explore one of the most indulgent and beloved treats in the dessert realm: Decadent Chocolate Lava Cakes. These rich, gooey, and utterly irresistible cakes have captured the hearts of chocolate lovers worldwide. Whether you’re a seasoned baker or a beginner, this recipe is sure to become your go-to for special occasions or simply when you crave something truly special.
The concept of a lava cake is simple yet magical. It’s a small, individual-sized cake that is baked until the outside is set but the inside remains molten and gooey, oozing out when cut into. The contrast between the warm, fudgy center and the slightly crisp exterior creates an unparalleled sensory experience. This dessert is not just about the taste; it’s also about the presentation and the anticipation that builds as you prepare to take that first bite.
Ingredients for Decadent Chocolate Lava Cakes
To create these luscious chocolate lava cakes, you’ll need a few key ingredients. Each one plays a crucial role in achieving the perfect texture and flavor. Let’s break them down:
- Dark Chocolate (at least 70% cocoa solids): The foundation of any great chocolate dessert. High-quality dark chocolate ensures a rich, intense flavor that won’t be overshadowed by other ingredients.
- Unsalted Butter: Adds richness and helps to emulsify the batter, ensuring a smooth and velvety consistency.
- Eggs: Provide structure and leavening. For the best results, use room temperature eggs.
- Sugar: Enhances the natural sweetness of the chocolate while adding moisture to the cake.
- All-Purpose Flour: A small amount of flour is used to give the cake a slight structure without compromising its gooey interior.
- Vanilla Extract: A subtle addition that enhances the overall flavor profile.
- Optional Toppings: Whipped cream, powdered sugar, fresh berries, or a drizzle of caramel sauce can elevate the presentation and add extra layers of flavor.
Equipment Needed
Having the right equipment will make the process smoother and ensure that your lava cakes turn out perfectly. Here’s what you’ll need:
- 6-ounce ramekins or small baking dishes: Choose oven-safe ramekins that can withstand high temperatures.
- Baking sheet: To place the ramekins on for even heat distribution.
- Double boiler or microwave-safe bowl: Essential for melting the chocolate and butter smoothly without burning.
- Whisk: For mixing the ingredients together.
- Offset spatula: Useful for spreading the batter evenly in the ramekins.
Step-by-Step Instructions
Step 1: Prepare the Ramekins
Preheat your oven to 425°F (220°C). While the oven heats up, prepare your ramekins. Lightly grease each ramekin with butter, then dust them with cocoa powder. Tap out any excess cocoa powder, ensuring that the ramekins are evenly coated. This step is crucial as it prevents the cake from sticking and adds a touch of extra chocolate flavor.
Step 2: Melt the Chocolate and Butter
In a double boiler or microwave-safe bowl, melt the chopped dark chocolate and unsalted butter over low heat. Stir frequently to ensure even melting and prevent scorching. Once the mixture is smooth and glossy, remove it from the heat and let it cool slightly. This cooling period is important because adding eggs directly to hot chocolate can cause them to cook, resulting in a grainy texture.
Step 3: Combine the Wet Ingredients
In a separate bowl, whisk together the eggs and sugar until the mixture becomes pale and thick. Add the vanilla extract and stir well. Then, gradually incorporate the cooled chocolate mixture into the egg-sugar mixture, whisking continuously to ensure everything is well combined. The goal is to achieve a smooth, homogeneous batter.
Step 4: Mix in the Dry Ingredients
Gently fold in the all-purpose flour using a spatula. Be careful not to overmix, as this could lead to a dense cake. You want the flour to be just incorporated enough to give the batter some structure without overpowering the chocolate.
Step 5: Fill the Ramekins
Divide the batter evenly among the prepared ramekins. Use an offset spatula to spread the batter evenly, ensuring that each ramekin is filled to about three-quarters full. This allows space for the cake to rise during baking.
Step 6: Bake the Lava Cakes
Place the ramekins on a baking sheet and slide them into the preheated oven. Bake for approximately 12-14 minutes, depending on your oven and the size of your ramekins. The cakes should be puffed and cracked on top, with a slight jiggle in the center. Overbaking will result in a fully set cake, which defeats the purpose of a lava cake.
Step 7: Serve Immediately
Remove the ramekins from the oven and let them sit for about 1 minute before serving. Carefully invert each cake onto a plate, allowing the molten center to flow out. Garnish with your choice of toppings such as whipped cream, fresh berries, or a drizzle of caramel sauce. Serve immediately for the ultimate indulgence.
Tips and Variations
Temperature Control
One of the most critical aspects of making a perfect lava cake is controlling the temperature. Ensure that your eggs are at room temperature before adding them to the melted chocolate. Cold eggs can cause the mixture to seize, leading to a grainy texture. Additionally, be cautious not to overbake the cakes, as they should still be gooey in the center.
Variations
Feel free to experiment with different flavors and ingredients to customize your lava cakes:
- White Chocolate Lava Cakes: Substitute dark chocolate with white chocolate for a milder, creamier flavor.
- Coffee-Infused Lava Cakes: Add a shot of espresso or strong coffee to the melted chocolate for a mocha twist.
- Spiced Lava Cakes: Incorporate a pinch of cinnamon, nutmeg, or chili powder for a warm, spiced kick.
- Nutty Lava Cakes: Stir in finely chopped nuts like hazelnuts, almonds, or pecans for added texture and flavor.
Conclusion
Decadent Chocolate Lava Cakes are a true testament to the power of simplicity. With just a handful of ingredients, you can create a dessert that is both visually stunning and incredibly satisfying. Whether you’re hosting a dinner party or treating yourself to a special evening, these lava cakes are sure to impress. So, roll up your sleeves, gather your ingredients, and get ready to indulge in the ultimate chocolate experience. Happy baking!